FREE STANDARD DELIVERY ON ORDERS OVER £50 TO MOST UK MAINLAND POSTCODES
by Ben Platt March 14, 2022
Traditionally dry pastels come in the form of sticks of colour, pigment and a base of gum or a similar binder. Pastel is made with a high concentration of pigment to binder which makes them distinctly rich in colour and blend with great ease, usually with little more than your finger. Whilst pastels rose to prominence during the 18th century, they have maintained their position as a popular medium since. In 2007 a new kind of pastel made its way into the world of art materials, the PanPastel.
So what is the story behind the PanPastel and what are the best ways of making use of them?
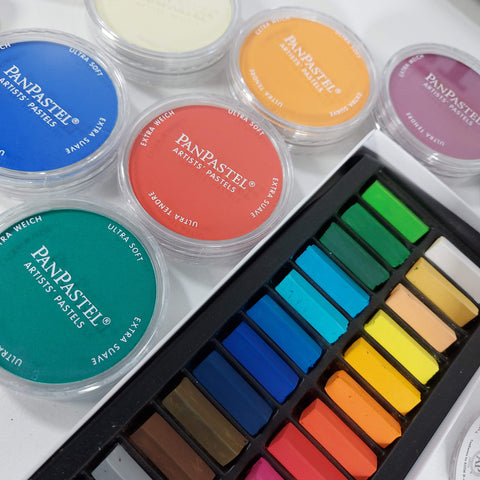
PanPastels on the left and their traditionally shaped dry pastel cousins on the left.
PanPastels were conceived of by Bernadette Ward & Ladd Forsline, who were interested in reinventing the way artists approached pastels. In their own words;
“The idea behind the development of PanPastel was to create a dry colour medium that would work like a fluid paint.
We saw that the pastel medium hadn’t changed from the stick format for hundreds of years; and before that, going back thousands of years, humans had used raw pigments and earth to draw and paint.”
They succeeded in creating a new method of presenting pastels and developed a suite of tools to tease the best possible results from their product.
An example of the smooth yet intense colour that PanPastels can apply.
The PanPastel consists of plastic stackable pans which house a compressed cake of pigment, with just enough binder to maintain a solid coherency with the pigment. The low amount of binder produces a purer colour, which in turn means for cleaner colour mixing and superior blending potential.
What you get is a neat little package that delivers velvety smooth dry colour when applied with a soft sponge or brush. All you need to do is take your pastel painting tool of choice, tortillon, brush, make-up sponge, finger and run it across the pan’s surface and then apply it to your paper. Very simple, but very effective.
PanPastels are available in 92 colours which cover a selection of shades and tints. Plus a dedicated range of 6 pearlescent colours, 6 metallic colours and 5 mediums.
You can use them to establish the broadest strokes of a piece swiftly and effectively cover large areas with smooth consistent colour, ideal for landscapes, seascapes and skylines or sunsets. For precise and fine marks you can use a sponge with a sharp edge or even a finely pointed paint brush to pick up colour and apply it with greater control and precision.
PanPastel Sofft Knives and Sponge Covers set, perfect for making a variety of marks.
PanPastels are a superb medium to explore with just a handful of colours and some paper but with a few clever choices and techniques you will increase the versatility of your materials tenfold. We will share a few things to help you get the most out of working with PanPastels which will help you get the most out of them.
Paper is important
When using your pastels you should use a paper that has some texture to it. PanPastels work just like regular pastels in this regard and prefer a surface with a bit of tooth to it, that way the pigment has something to cling to. The rougher the texture the more pronounced and extreme the effects you can achieve.
Also keep in mind the colour of that surface can be just as important. Picking a colour other than white for your paper opens up a host of possibilities for you. The base tone of the paper can reinforce, create contrast or compliment the colours you choose to use. Having a mid tone coloured paper also lets you work both up and down with light and shadow, since it is easier to add white to a drawing when not working on white paper.
Combine mediums
PanPastels are excellent at setting up large areas of colour and can block in areas of a drawing very quickly, PanPastels are not as precise as a conté crayon or pastel pencil however, so do not be shy about using other media alongside your PanPastels. Using them alongside watercolour, acrylic, gouache and coloured pencils you can create a myriad of effects, dry dusty looks or soft powdery clouds on a landscape or the mist of foam from crashing waves. Experiment and see how you can augment your pastel work with other media and vice versa. We would recommend using a fixative which seals the pastels should you want to work on top of them afterwards, or overall to protect against smudging.
Think like a painter
Pastels are often considered to be the medium that bridges painting and drawing, as drawing with pastels is often referred to as painting so it helps to think like both. It can be easy to get stuck into the habit of using pastels like any other drawing medium but if you use a soft brush with a PanPastel you can apply them as if they were paint. Blend them with the brush to make colour transitions, layer colour and gradient tones and tints and hues. Pastel is also erasable to some extent so you can work into them with an eraser to great reduction technique effects, much like you would use an eraser when working with charcoal to create the illusion of light shining and reflecting.
A cracked PanPastel can be repaired
Dry pastels of all ilks dislike being dropped, knocked or shocked but sometimes it happens and we end up with a cracked pastel. While not an awful lot can be done for a traditional pastel at this point, you can repair a pan pastel. It might end up looking a little rougher than before but they can be revived to a perfectly usable condition.
To repair your PanPastel you will need some pure isopropyl alcohol (aka rubbing alcohol) of 70% strength or higher to ensure the best results.
Along with the isopropyl alcohol you will need a ziplock food bag, or something similar.
Decant the contents of the broken PanPastel into the food bag, close it up and take a large spoon, rolling pin or another blunt object with a broad, smooth edge and proceed to crush the pastel remnants into a finer powder.
Pour the powder back into the pan and add a few drops of isopropyl alcohol to it, do not add too much, you want a paste-like consistency which you can mix and smooth out with a teaspoon. Leave this to dry overnight and then your PanPastel is ready for use again.
There might be some cracks leftover from where the pastel has shrunk as the alcohol evaporates, if this bothers you, repeat the process and it should reduce the craggy look.
Prep your own surface - If you are looking to branch out the surfaces you wish to work on with pastels then you are in luck as GOLDEN produces an acrylic medium called pastel ground. This thick acrylic medium requires thinning 20% to 40% with water prior to use and should be applied to a primed or sealed surface. We suggest using a soft flat brush or sponge brush for a smooth application.
This will provide you an excellent surface for working with pastels and PanPastels alike on surfaces such as canvas, wood and cardboard or any other primed surface.
Selection of pastels paper and card pads, tubes of gouache, pastel ground and a can of fixative gives you an example of the multitude of materials you can combine PanPatels with.
It is clear to see PanPastels have not only made their mark on the art world but are clearly here to stay. They filled the gaps between paints and pastels and for many artists they have become mainstays of their toolbox. If you are interested in pastels and have not given them a shot yet then we cannot recommend PanPastels enough, they will without a doubt change the way you think about pastels once you have given them a go.
Comments will be approved before showing up.
by Ellie Jakeman November 20, 2024
by Izzy Latimer November 13, 2024
by Ellie Jakeman November 05, 2024
Sign up to get the latest on sales, new releases and more …