
Unsure where to get started with stretching your own watercolour paper? Never fear! In this How-To guide, we'll take a look at how to stretch your own watercolour paper to ensure it gives you the optimal performance while painting.
What Do I Need to Consider When Stretching My Own Watercolour Paper?
Beyond the fundamental consideration of paper type, size is often an immediate and significant factor. The dimensions of the paper will inherently dictate the scale of the artwork and can influence compositional choices. However, the decision-making process extends far beyond mere dimensions.
Surface texture is another crucial element. Different papers offer a range of textures, from smooth hot-press surfaces that allow for fine detail and even washes, to rough cold-press papers that provide tooth for layering and create distinctive effects, particularly with dry media or granular pigments. The texture chosen should align with the desired aesthetic and the specific techniques an artist intends to employ.
The longevity of the artwork, often referred to as its archival quality, is of paramount importance, especially for artists who aim for their creations to endure over time. Archival papers are acid-free and often made from cotton fibres, which resist yellowing, brittleness, and deterioration over decades. Using non-archival paper, even for preliminary sketches, can lead to irreversible damage and fading of the artwork.
Finally, the weight of the paper, typically measured in grams per square meter (GSM) or pounds (lb), is a critical indicator of its durability and how it will react to various media. Heavier papers are generally more robust, less prone to buckling or warping when wet, and can withstand more rigorous techniques such as multiple layers of paint, scrubbing, or lifting.
For watercolour artists and those working with mixed media, the vast array of "watercolour" paper brands available on the market can be overwhelmingly confusing. It's crucial to understand that not all these brands will be equally suited to every artist's individual working style or preferred techniques. This is particularly true for artists who frequently employ water-intensive methods, such as extensive washes, or those who incorporate a significant amount of fluid and mixed media, including water-based or acrylic inks, or high-flow paints.
The varied sizing, fibre content, and manufacturing processes of these papers mean they will react differently to water and pigment. Some papers may absorb water too quickly, leading to flat washes, while others might repel it, causing pigment to sit on the surface.
Understanding these nuances is key to achieving desired results. Hopefully, the detailed information provided in this guide will offer much-needed clarity and assist artists in making informed choices tailored to their specific needs.
Stretching is a method by which the paper is expanded and then secured to a rigid surface, typically a board, before painting. This process causes the paper fibres to swell and then contract as they dry, resulting in a taut, drum-like surface. The primary benefit of stretching paper is its ability to guarantee that the artwork will remain perfectly flat and straight throughout the entire creative process, while it is drying, and long after the masterpiece is completed. This eliminates the frustration of buckling, warping, or cockling, which can occur when paper becomes saturated with water, ensuring a smooth, even surface for consistent application of media and professional-looking results.
Overview of Watercolour Papers and their properties
Things to know before buying watercolour paper:
Watercolour paper is made from either cotton rag, cotton linters, wood pulp, or a combination of cotton and other cellulose fibres, such as bamboo. The most expensive watercolour papers are made from 100% cotton rag and provide the best results in terms of brightness of hues and longevity (acid-free), and are robust enough to take most, if not all, of the watercolour painting techniques, such as wet-on-wet, scraping and scratching techniques and heavy paint washes. They are usually acid-free, archival and are the professionals' choice. Beginners, and intermediates who are just starting out and are on a tight budget, could use a mixture of cotton and wood pulp at a lesser price.
Sizing
Most, if not all, watercolour papers are either tub-sized or externally sized. Sizing the paper controls and regulates the absorption of paint into the paper, allowing more time to place paint where you want it to go and add detail if required. Size is either made from gelatin, starch, or a synthetic gelatin substitute.
Watercolour papers can be either handmade (with deckled edges), machine-made or mould-made. Some machine made paper can replicate the deckled edge found in hand made papers. Usually, artists work on the side of the paper where you can read the watermark or where the paper is the smoothest for hot-pressed paper.
Your Options - Watercolour Paper Surfaces
Watercolour paper comes in three different surface types;
Rough: This is the most textured surface and is suitable for those with a loose expressive watercolour painting style. Artists who like to use dry brush techniques use this paper as the tooth of the paper holds the paint to create textured detail, it is also good for granulation techniques where the pigment settles in the little dimples of the paper. It is mostly used by intermediates and professionals.
Cold-Pressed or NOT: This has a medium textured surface and works well for wet and dry techniques. The slight tooth allows for texture and detail in your work. This is most favoured by the intermediate, beginner and professional.
Hot-Pressed: this is the smoothest of the watercolour papers and an excellent surface for artists and illustrators alike. This paper surface is suitable for fine detail and flat finishes as it is completely texture free.

Watercolour papers and their weights
Watercolour paper comes in individual loose sheets, rolls, blocks, spiral/wire bound pads, hard-bound pads, postcards and sketchbooks.
The thickness of watercolour paper is indicated by it's weight: it is measured either in grams per square metre, often abbreviated to (gsm), or pounds per ream, often seen as (lb). It comes in many weights, the heavier the weight of paper the more scraping, and water and wash techniques can be used.
The standard machine weights that may need stretching are; 90lb (190gsm), 95lb (200gsm) and 140lb (300gsm).
The standard machine weights that do not need stretching as a rule are; 260lb (356gsm) 300lb (638gsm).
Handmade papers are usually the heaviest of the watercolour papers, and are robust and the most durable.
Stretching watercolour paper is a technique used to prevent your paper warping or cockling. Unstretched paper that is less than 200lb or 425gsm may move and create hills and valleys while you are working on it especially if you use a lot of wet-on-wet or wash techniques, resulting in your pigments pooling in one place.

Rough, Cold Press and Hot press paper surfaces.
Stretching watercolour paper. You will need;
- Craft knife
- Clean sponges
- Clean sealed MDF or sealed Marine plywood board (preferably sealed with varnish, or acrylic medium to make them waterproof).
- 2inch/5cm-wide gummed paper tape.
- Watercolour paper.
- Scissors.
- Staple gun and staples (depending on which stretching method you are using).
- Staple remover (depending on which stretching method you are using).
- Strips of card, acetate or lollipop sticks (depending on which stretching method you are using).
- Large, clean and grease-free tray/tub for submerging your paper.
- Lukewarm water.
- Spray bottle.

Techniques and Tips
Have all equipment ready and prepared before you start. The dimensions of your paper must be at least 3 inches or 10cm smaller than the board you are stretching onto, to accommodate the width of the gummed paper tape. Have your clean, grease free board near your water tray/bath. Your paper will be fragile when wet and will stretch when carried, this applies to larger size papers. Where possible, have enough room to walk around the table or at least be able to turn your stretching board around.
Remember when planning your painting that you may want to cut off the gummed paper strip left on your paper so aim to either leave a good size border around your work, or leave the gummed paper strip on and this will be covered by a mount frame when you come to frame your work.
A top tip would be to stretch several pieces of paper at a time on several boards, just in case of failure and to save time.
Technique 1: Submerge paper in a water bath/tray (Wetting paper)
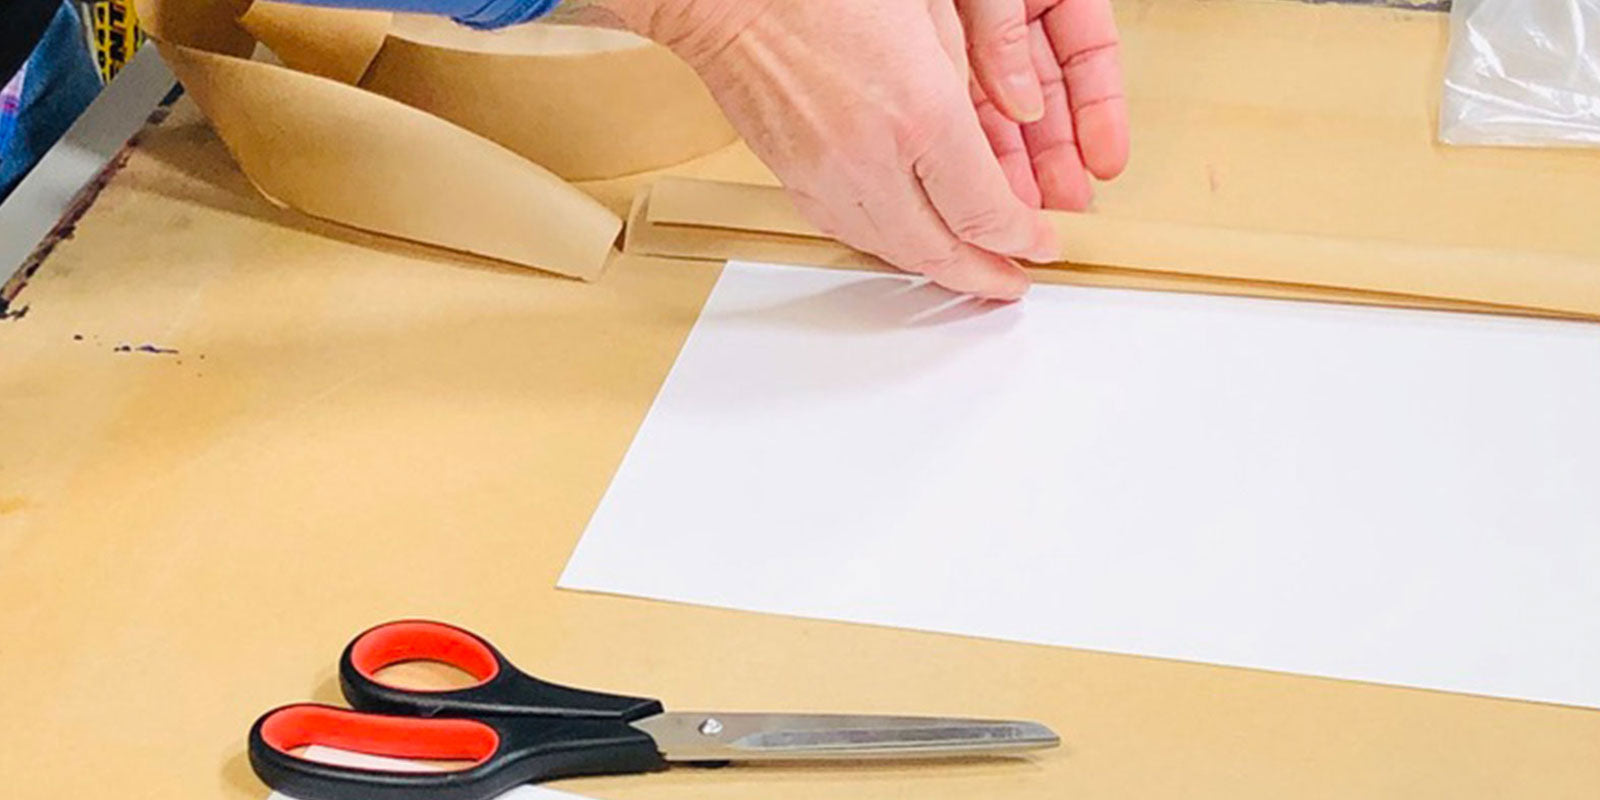
- Cut gummed paper strip tape at least 1 inch/3cm longer than your paper on all four sides. (Do not have your gummed paper tape roll near the sink or water bath/tray. If your gummed tape roll gets wet it will be ruined, try keeping it in a clear plastic sandwich bag).
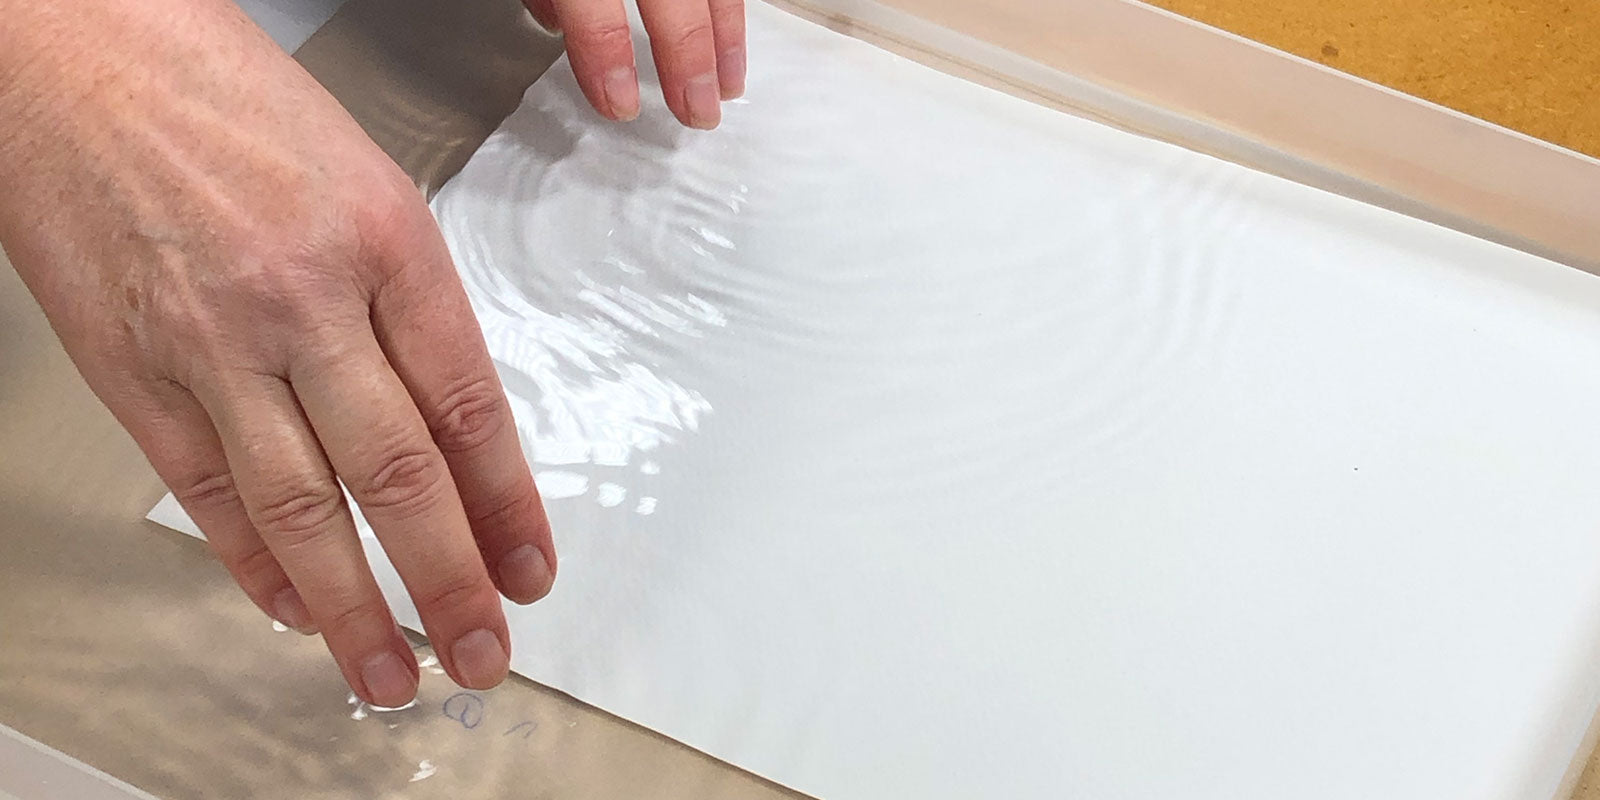
- Fill your tray or bath with lukewarm clean water, make sure your bath/tray or sink is free from grease and dirt.
- Submerge your paper and soak for at least 5 to 10 minutes for 140lb paper, maybe a little less for 90lb paper, and a little more for heavier paper. (Do not over soak, this will lead to the size being washed off or the disintegration of paper).
- Whilst waiting for the paper to soak, dampen the stretching board. This will help the paper glide on the surface for repositioning.
- After soaking, lift the paper carefully using paper tags. (Tags can be made of clean paper folded over; this is to stop any transference of grease or dirt from your fingers onto the paper) Hold the paper by the two corners and lift above the bath so excess water can drip off. Don't hold the paper for too long over your bath as it might tear; the paper should be very floppy and delicate at this point.
- Carefully lay the paper flat onto your clean, dampened board. Don’t worry if there are a few air bubbles. Try to be as central as possible leaving at least 2 inches - 5cm all the way around the paper.
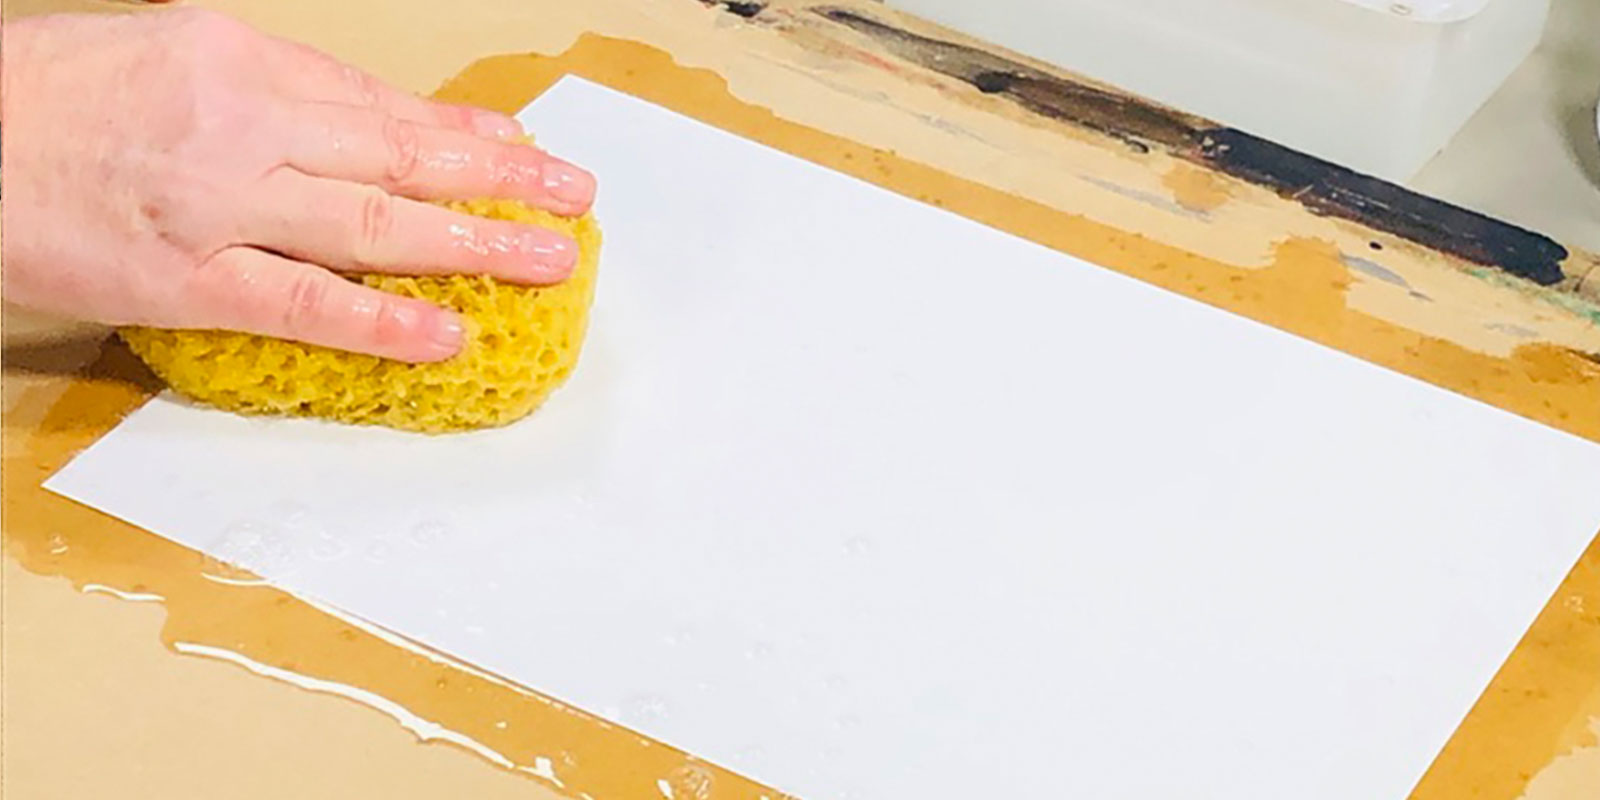
- With a damp, clean, soft sponge, and starting from the middle of the paper, carefully push any air bubbles out to the edges of the sheet (Don't press too hard or scrub your paper).
- Once the air bubbles are all out, dampen the board using a spray bottle or sponge all the way round the edge of your paper, then gum strip the paper edges down. Make sure you cover the paper at least 2.5cm from its edge. Approximately half of your gummed paper strip should be on the board and half over the paper. Press the gummed paper strip firmly down to ensure adherence to the paper and board has taken place. There should be no air bubbles or ripples in your gummed paper strip or paper. However, if there are small ripples they will dry out during the drying-out and stretching process.
- Be careful not to drip any gummed paper strip glue over the middle of the paper. This will show up in your painting.
- Lay your board flat and leave to dry in a non-humid room. Do not lean it up against a wall, or by a radiator, or in direct sunlight. This will make the paper dry at different rates and pull away from under the tape. Also, do not be tempted to use a hairdryer! Aim to leave your paper as long as possible- preferably overnight.


Technique 2: Wet paper on the board
- Cut gummed paper strip tape at least 1 inch/3cm longer than your paper on all four sides. (Do not have your gummed paper strip roll near the sink or water bath/tray. If your gum tape roll gets wet it will be ruined. Try keeping it in a clear plastic sandwich bag.)
- Have a bucket of clean, lukewarm water ready by the board. Dampen the board with water.
- Lay your paper on the board and soak with a soft sponge. Make sure your hands are clean and grease-free. Work your sponge lightly over the paper. Do not scrub. The paper will darken in colour as it absorbs the water. Turn paper over and soak the other side. Do this several times. This should take at least 5 to 10 mins.
- When your paper is sufficiently soaked with water, with a damp, clean, soft sponge, and starting from the middle of the paper, carefully push any air bubbles out to the edges of the sheet. (Don't press too hard or scrub your paper.)
- Once the air bubbles are all out, your board should still be damp enough to lay your gummed paper strip down around all 4 sides. Make sure you cover the paper at least 2.5cm from its edge. Approximately half of your gummed paper strip should be on the board and half over the paper. Press the gummed paper strip firmly down to ensure adherence to the paper and board has taken place. There should be no air bubbles or ripples in your gum strip or paper. However, if there are small ripples, they will dry out during the drying- out and stretching process.
- Be careful not to drip any gummed paper strip glue over the middle of the paper. This will show up in your painting.
- Lay your board flat and leave to dry in a non-humid room. Do not lean it up against a wall, or by a radiator, or in direct sunlight. This will make the paper dry at different rates and pull away from under the tape. Also, do not be tempted to use a hairdryer! Aim to leave your paper as long as possible- preferably overnight.


Removal of paper
Let your artwork dry completely before removal.
Using a metal ruler as a guide, and a sharp knife, score the edge of your paper where it meets the board on all four sides. You do not need to exert too much force.
Once the gummed paper strip has been scored, you can place your knife just under the paper’s edge lifting the paper off the board and cutting the tape in places that may still be attached.
You can then guillotine the gum strip off your work or leave it on. (however some gummed paper strips may not be archival).
The gum strip left on your board should be soaked off, a wall-paper stripper knife is good for this job.
Wash all glue residue off your board as the next piece of paper you stretch may be bigger than the last and could stick to the board causing it to tear.
Technique 3 Stapling your paper to the board
This method would be better suited to watercolour paper where you wish to retain the deckle edge.
- Wet and soak your paper either by the submersion technique or soak with a sponge and spray onto the board.
- Lay your paper flat onto your board, removing all the air bubbles.
- To protect your wet paper and edges from the staples, you can either use thin strips of clear plastic acetate (the stiff kind used for overhead projectors) cut to 2cm wide. The length will depend on the size of your paper. You can also use soft wooden lollipop sticks.
- Lay the plastic strip down, then staple from one corner to the other, leaving a gap of about 2 inches between staples. You can also leave small gaps between the acetate strips or sticks.
- Lay your board flat and leave to dry in a non-humid room, do not lean it up against a wall, or by a radiator or in direct sunlight. This will make the paper dry at different rates and pull away from under the tape. Also do not be tempted to use a hairdryer! Aim to leave your paper as long as possible preferably overnight.
- Once your artwork is completely dry, use a staple remover to remove the staples and the acetate strips or lollipop sticks, this should be quite easy and they should have prevented any damage to the deckled edge and your paper. The acetate or lollipop strips can be used more than once.

Watercolour paper you may need to stretch if using heavy wash, wet on wet and scraping techniques


Alternative to stretching watercolour paper.
An alternative to stretching watercolour paper is ‘watercolour board’. This is watercolour paper laminated to a board similar to mount board. Similarly, watercolour canvas boards do not need stretching.
Also, some watercolour paper can be bought in a block or glued pad. This means either 2 sides or four sides are glued together so the paper remains stretched whilst painting, preventing cockling. However some of the lighter-weight papers in a block still do move slightly.
Watercolour paper Blocks;
|
Saunders Waterford Block - 300gsm - 140lb  |
Hahnemühle 'Harmony' Watercolour Blocks - HOT PRESSED - 300gsm  |
Bockingford Watercolour Blocks - 140lbs / 300gsm - Hot Pressed - 12 Sheets
 |
Winsor & Newton Watercolour Gummed Pads - 140lb/300gsm  |
No stretch - Watercolour boards.
- Langton Prestige Watercolour Board 30"x22" (76x56cms)- Packs of 5 (Cold pressed)
- Langton Prestige Watercolour Board 30"x22" (76x56cms)- Packs of 5 (Rough Grain)
- Langton Prestige Watercolour Board 30"x22" (76x56cms)- Packs of 5 (Hot pressed)
No stretch - Heavyweight Watercolour paper
- Arches Rolls Of Watercolour Paper - 300gsm - 44" x 10 yards (NOT).
- Arches Rolls Of Watercolour Paper - 300gsm - 44" x 10 yards (Rough)
- Arches Rolls Of Watercolour Paper - 300gsm - 44" x 10 yards (Hot Pressed).
- Hahnemühle Aquarell Anniversary Edition Watercolour Paper, 200lbs (425gsm) x50 sheets. 24x32cm.
- Hahnemühle Aquarell Anniversary Edition Watercolour Paper, 200lb (425gsm) x50 sheets. 30x40cm.


2 comments
Hi Tomas, yes you are correct, not all watercolour paper needs stretching. As a rule the thicker and heavier weight watercolour paper and watercolour blocks may not need stretching. It would be a good idea to stretch your paper if you were using a lot of wet on wet techniques, however if you work with mostly a dry brush on a heavier paper it may not be necessary to stretch your paper.
I had a look at your blog and it is very comprehensive with some great articles.
H, Ellie, Is stretching watercolour paper always necessary or does it depend on certain factors, such as paper thickness or size?
Btw. I’m also writing about watercolor painting on my blog: https://www.watercolorhub.com/ – would appreciate your feedback on it :)